Each new property or location will likely require a separate processing account (unless you collect for multiple locations under the same name and bank account). *See discussion of "How many processing accounts do I need" at the bottom of this article. Setting up new accounts will be done through your PlacePay Dashboard and all sensitive information is fully encrypted. Supporting documentation should be sent to implementation@placepay.com.
Note On Timing: Setting up and submitting each account should take under 5 minutes per account. Approval / Activation turnaround can take 7-10 business days.
SUBMIT A NEW ACCOUNT:
Below are step-by-step instructions to set up new processing locations. For each building/processing location, you have (3) distinct steps. IMPORTANT: Step 3 reviews supporting documentation and it is highly recommended that you provide when submitting your accounts. Please read through each of the steps before starting. Let us know if you have any questions.
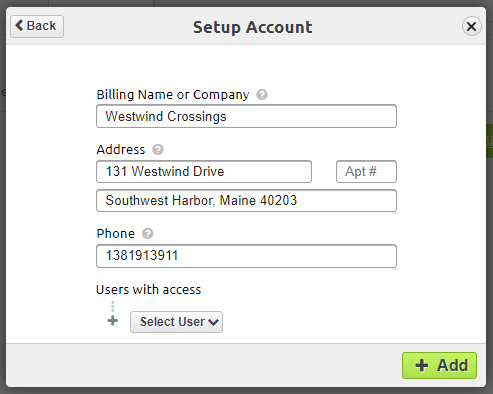
- STEP #1 Add Payee / Location Information - You will be asked to enter a business name, address, and phone number which will serve as your Merchant Bank Descriptor. This is the information that shows up on your customer's credit card and bank statements. It's best to have this be the DBA and address/phone number that your customers recognize in order to minimize accidental disputes. (Note, this must be done before completing the next step.)
-
- Log into your PlacePay Dashboard and complete the following:
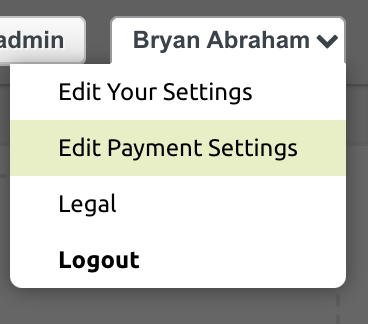
- Click your name in the upper right hand corner.
- Select "Edit Payment Settings" from the drop-down

- Log into your PlacePay Dashboard and complete the following:
-
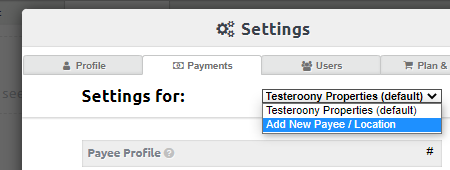
- Select or Add Payee / Location - Each processing entity or new location you add will show in the dropdown to the right of “Settings for” (pictured below). If you have locations already added, select the one you would like to modify, or if you would like to add an entirely new processing account, select "Add New Payee / Location" from that same dropdown.

You will then be prompted to add a billing name and contact information. This should be public-facing information you wish to have visible to clients or residents.
- Select or Add Payee / Location - Each processing entity or new location you add will show in the dropdown to the right of “Settings for” (pictured below). If you have locations already added, select the one you would like to modify, or if you would like to add an entirely new processing account, select "Add New Payee / Location" from that same dropdown.
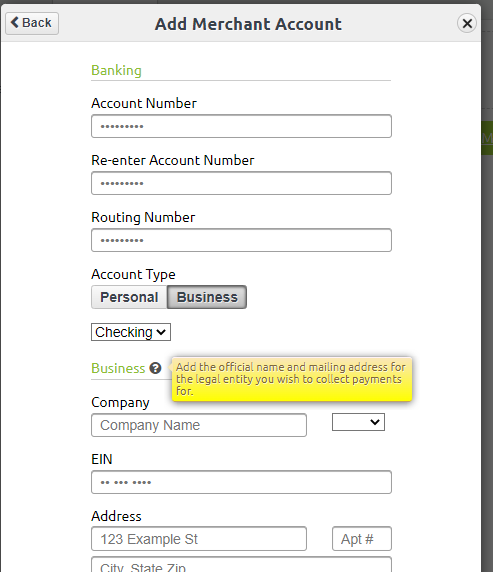
- STEP #2 Submit Merchant Application. Remaining in the “Payment Settings” tab, click on the drop down to the right of “Merchant Account” and select “Add Merchant Account”

- Add only ONE banking / entity form per location. PLEASE BE VERY CAREFUL AND ACCURATE WHEN DOING THIS STEP. Mitigation of errors and inaccurate information is a slow process with our sponsor bank. Hover your mouse over the “?” next to each section for more details on how to fill in the fields.
- Pro-Tips for some of the key fields on the Merchant Application:
-
-
- "Company Name": It is crucial (and required by law) that the name entered in this field matches EXACTLY what is on file with the federal government. Reference the company’s SS4 or articles of incorporation to ensure every character of the company name matches. Do not enter a DBA here. Clients and Residents will not see this name.
- "Address": This should be the current physical registration address for the business and should not be a PO Box.
- “Greatest Expected Single Monthly Payment”: This helps us set / get approved the appropriate per-transactoin limit for each location. This can always be updated later if you reprice units. For extremely high commercial rents, we may need to ask for a copy of a lease during the underwriting period.
- "Beneficial Owner(s)/Officer(s) Name": All US financial services institutions are required to collect identifying information on any natural person who benefits over 20% of the entity. Click the plus button to add multiple beneficial owners. This is for KYC and not a tax reporting exercise. If the entity is owned by another entity, the requirement is still for natural persons. For Co-Ops, public companies, and REITs with a large number of equity holders (none with over 20% ownership), please provide the name and identifying information of a Controlling Officer for the entity who is an authorized signatory and considered a 'financially controlling party' of the business (e.g. CFO, COO, etc.)..
- "Owner's %": Leave ownership % blank if the Controlling Officer, in that case, has no ownership. Note also that the percentage amounts do NOT have to add up to 100%.
- "Owner's Email": This should be the direct email for the owner and/or controlling officer. It is used for verification purposes and will not be provided to members/residents.
-
Agree to terms and a "soft" credit pull. As a part of the activation and underwriting process, credit may be pulled on one or more business owner's provided to help verify their information. This type of credit pull is called a "soft" pull and will NOT affect one's credit score.
(For Integrated Accounts) Ignore Default Subscription Popup: Once you have completed the processing form you may be directed to “setup subscription”. Click “later” to close that window. Integrated customers do NOT need to set up subscriptions.
- STEP #3 Send Supporting Documentation: We recommend gathering and emailing the following documentation to implementation@placepay.com. These documents are not required to complete the processing application, BUT they do greatly assist in a smooth and timely underwriting/boarding process and may be requested later if they are not provided upfront.
-
- Copy of Each Entity’s SS4 - OR - if you do not have easy access to an SS4, please provide ONE of the following documents as a substitute:
- 2021 Tax Returns
- Articles of Incorporation
- Copy of Each Entity’s SS4 - OR - if you do not have easy access to an SS4, please provide ONE of the following documents as a substitute:
-
-
-
- Copy of a Voided Check or Bank Letter - This helps us ensure that the correct banking information was entered and can eliminate delays caused by accidental miss-entry on the application.
-
- **High Ticket Requirements -If you expect one or more individual customers to make payments exceeding $10k in a two-week period, you may be asked to provide 3 recent bank statements.
-
UNDERWRITING:
After you submit your processing account application and supporting documentation, PlacePay’s underwriting team gets to work verifying your information and boarding your account with the payment networks. If more information is needed, we will let you know via email but otherwise, no news is good news and you should expect to receive an activation email in 5 to 7 business days.
WHITELISTING PLACEPAY WITH YOUR BANK:
This is a good step to complete while you wait for your new account to be activated. It is required that PlacePay be whitelisted to debit and credit any processing bank account.
Some corporate bank accounts (especially those using "Positive Pay") may not allow ACH debits by default.
The PlacePay company ID for NACHA (ACH Whitelisting) is 1043575881. Our originator ID is 0007481062. Most institutions use the former, some - like BOA - use the latter.
Provide this information to each of your bank reps for any bank accounts you intend to process payments through to ensure Positive Pay does not autoblock PlacePay debits.
If it is required for your business to use one bank account for debits and another account for credits, please add the second bank account under the same location. Then email implementation@placepay.com to specify which bank account should be used for debits and which should be used for credits. Identify the bank account by the last four digits of the account number. Never send full account numbers in plain text to PlacePay via email.
ACTIVATION CONFIRMATION:
You will receive a system confirmation email from Implementation@PlacePay.com once your account has been approved and is ready to be connected to your partner software. Your partner software will be cc’d on this notice and will handle the remainder of your setup process.
Edit Settlement Bank Account on a Processing Account
You will need to apply for a new merchant account following the steps above.
Delete Bank Account
- Click your name in the upper right hand corner
- Select "Edit Payment Settings" from the drop-down
- Select the Deposit Method drop-down and click the trashcan icon next to the bank account you wish to delete.
NOTE: at this time if you only have ONE bank account added you will need to add a new bank account before the existing account can be deleted. This is to ensure your payments always have somewhere to deposit. If you would like to stop deposits and remove all bank accounts linked to your account, just email help@placepay.com your request and we can get that taken care of for you right away.
How many Processing Accounts do you need?
A separate processing account is required for each bank account that you, the real estate operator, receive daily batch settlements into. (It's also required for each additional EIN / legal entity doing business, but those should already be qualified by the separate bank account above).
You may also elect to have additional processing accounts if you'd like separate daily batches into a single settlement bank account, or you'd like the payers (tenants/residents) to see different Billing Descriptors on their card/bank statements. Such as a Rent processing account versus a Services one.

Comments
0 comments
Article is closed for comments.